Thursday, June 28, 2012

Nutella Cookies

During my short summer, I'm nannying the boys a couple times a week that I used to be a full time nanny for. I started with them in preschool and 3rd grade and now, they are going into 3rd and 7th grades! I have a few fun things planned to do with them but mostly they will be going to day camps on the days I have them. Today we are going to see Madagascar 3 and grab some yummy Golden Spoon. But yesterday, we made Nutella Cookies!

I already liked Nutella but I really fell in love with it in Italy when all our hotels served brioche with little Nutella packets for breakfast. The boys hadn't tried it before so I gave them each a small taste and it was love at first bite. There's a very simple recipe for the cookies I found:

1 cup Nutella
1 cup flour
1 egg
1 tablespoon water

Preheat oven to 350, mix everything, place dollops on pan, bake 8-10 minutes...

DONE!

These are devilishly good so if you like Nutella, beware!

There are limits to self-indulgence, none to restraint.   ~ Mahatma Gandhi

Monday, June 25, 2012

Etsy Wedding Details

Etsy.com is a wonderful thing for those who have yet to explore it. Be careful - it can be dangerous! Fortunately, I discovered Etsy right around the time I got engaged and it continued to be an integral part of planning special details for the day. Etsy is a site where people can share their art, crafts, and skills and sell them to a wider audience. It is incredible all the things you can find on there! This evening is all about those special people and their talents that made my wedding unique!

Wedding Dress Hanger

This has to be one of my favourite details from the day. Erica May Made designed this beautiful hanger to showcase my dress and my new last name! It was so special to have this rather than the boring plastic hanger my dress came on from the bridal shop. I have gone back a few times already to get gifts for fellow bride!


Bridesmaids Bracelets

These bracelets were one of the first things I ordered off Etsy from Stellar Light Jewelry. I thought they were so elegant and added a sweet touch to my girls look.


Flower Girl Basket and Ring Bearer Pillow

I loved how many options there were to customize the kids accessories from Romancing Juliet! They were the perfect size for them to carry and the ribbons were left long for me to choose which length I wanted.


Garter Set

I absolutely adored my garter set from Krumpets Designs! I didn't want that tight elastic around my thigh all day so the flat, delicate lace was perfect. There were many colours to choose from and the pearls and netting added that something extra I was looking for. They also have the option to make the garters smaller or larger depending on your size. (Something those boxed sets from the bridal shops and the Knot don't do!) I only have a picture of the garter I kept but the toss garter (which ended up in the hands of our Best Man) is very similar with one eggplant coloured flower.


Flower Girl Necklace

Back in the day, I was a flower girl in my aunts wedding and I still have the necklace she gave me as a gift and to wear that day so I wanted to do the same for my little flower girl. It took some looking but I finally found a vender that had necklaces that were sweet AND had a child's length chain. Pickled Beads has beautiful jewelry and I found a sweet necklace that could have a 'T' for her initial and a pearl to match the bridesmaids bracelets. Too sweet!


Thank You Signs

This is a current trend that I jumped on the bandwagon for - taking a picture with some sign or banner that says 'Thank You' to place on your thank you cards. I love getting photos of the couple on or in thank you cards. It is so personalized and shares a professional photo with those who may not have any or could not come to the wedding. These gorgeous signs are from Wedology and the photo below is one of the few I chose for our thank you cards. Our videographer even used it in our montage! (See yesterdays post!)


Mustaches and Lips for Photobooth

We had an amazing photobooth at our wedding and knew mustaches needed to be in the prop bin. I found this great set of mustaches and lips from Piccadilly Party Co and they were a hit! Our guests loved them, we loved them, and I still have many of them left over, too!

Wedding Dress Label

I was searching for my 'something blue' and came across an article about wedding dress labels. These were especially popular in the early 1900's to personalize a wedding dress and make it extra special to pass on through generations. I found Monde Design and selected a beautiful design that they customized for me (you can pick other colours than blue!) then my seamstress that altered my dress sewed it into the hem so when I flipped it up, you could see it. It really made my dress feel like it was just for me!


These little details really added something special so my wedding day. Personalization is key if you want to make it your own and not like 'every other wedding.' Take the time to seek out the little things, you'll be happy you did!

“You all laugh at me because I'm different, I laugh at you because you're all the same.” ~ John Davis

Sunday, June 24, 2012

Wedding Videographer

The other exciting part of our dinner party on Friday was that we got to share our wedding video with our family. Our videographer was exceptional! 

We originally weren't going to have a videographer because we found them to be obtrusive at other weddings we had been going to around the time we were planning ours. That is, until our friend's July wedding last year. We walked into the ceremony and I thought "Oh look, they have a videographer. I wonder which family member he'll be blocking during the first dance." Pessimistic, I know. Well, it turns out that was my only thought about him (his name is Jeff from Silver Wings Media!) because I did not notice him the rest of the day! It wasn't until we were driving home that I asked Mike if he remembered there being one but we couldn't recall them being noticeable.

That's all it took for me! We watched our friend's wedding video when they received it, set up and appointment, and booked him! I loved how he (and his second, another Jeff!) were able to capture everything about our day without being in the way. Mike and I are so happy that we had Jeff there because once we watched our video about a week ago, the day began rushing back to us. The first look, stolen kisses, crazy dancing relatives... There were so many emotions experienced while watching it and I loved getting to see things on film that I miss because I was upstairs getting my dress bustled or visiting tables. I am even more thrilled that in 40 years, I can hear my daddy's toast and my mom's reading during the ceremony. Even better, I have blackmail against my ring bearer for when he gets older and has a girlfriend!

I know that videographers are not in everyone's budget. It certainly was not in ours but my wonderful Aunt and Uncle Nelson gave it to us as a gift! Even if you don't think you want one or definitely can not afford them, at least put someone in charge of filming the important events of the day. Your ceremony, first dance, toasts, cake cutting... You will honestly love having something to look back on besides your photos as well as being able to hear voices you will someday miss. 

So thank you, Jeff and Jeff from Silver Wings Media!


Here is the montage that was put together for us to share with everyone!


'Memory is a way of holding on to the things you love, the things you are, the things you never want to lose.' ~ Kevin Arnold

Our first dinner party using our wedding china and notes on Chianti

Friday was a special day for many reasons: It was the first day of summer break, I went to the DMV to change my last name, and we had family over for dinner to thank them for their love and support with our wedding back in March. Since the dinner was to celebrate the wedding, I thought it fitting to use our new china. (I've also been looking for an excuse!) Mike and I were very fortunate to receive all 12 place settings and 11 set of silverware. We registered for Waterford's 'Ballet Ribbon' at Bed Bath & Beyond though I know some family members purchased some on sale at Macy's. 

Our guest list included both of my parents, my Nanna, and Mike's mom. Mike's dad was out of town for business. I set the table with our Lenox 'Chirp' tablecloth and used the dinner plates, salad plates, platter, and serving dish from the set as well as our matching silverware and Ridel Syrah glasses. We were directed towards the syrah glasses because our 'registry helper' said they would be good for both white and red wine. I don't know if that is 100% true, but it works for me for now! Since our tablecloth had birds on it, I made up some quick, cute place cards with birdcages on them to add a special touch. My napkin rings already looked like bird nests and I borrowed cloth napkins that one of my great-grandmothers had embroidered.


 My menu included: 

Chevre with honey and candied pecans


The 'Wedding Salad' as we call it since it was served on our big day. Spinach, cranberries, candied pecans, crumbled goat cheese, and poppyseed dressing!


Chicken with Prosciutto and Marsala Wine Sauce. I baked the chicken with the proscuitto on it for about 40 minutes and it was perfect! The recipe for the marsala wine sauce was found here and was delicious.


Asparagus Risotto


Onions Stuffed with Pecorino Cheese. Mike and I learned how to make this in our cooking class in Florence. I will revisit and share the recipe on a later date!


Dessert was a beautiful chocolate cake that my mommy made and Nanna provided the bread!

Since there was a sort of Italian theme going on, I purchased Chianti from Lamole Lamole Winery in the Chianti region of Tuscany.  A few notes on Chianti that we learned in our wine class in Siena at the Tuscan Wine School:

~ If the bottle says 'Chianti Classico' it is from the Chianti region. If not, it is from somewhere else in the world.
~ Farmers are not allowed to irrigate their grapes in Italy. This means that their harvest heavily depends on the weather.
~ If the bottle says 'reserve' it means the wine aged 2 years in a barrel.
~ The same type of grape at the base of a hill has a different taste as one higher on the hill.
~ To truly know that you have a bottle from Tuscany, there needs to be a label around the top of the bottle that says DOCG or Denominazione di origine controllata ("Controlled designation of origin") and have a black rooster on it.


I'd have to say the most difficult part was timing all the food! I got so caught up with what I wanted to make that I didn't really plan anything that I could make ahead of time. I did my best but it came to the point where I was sitting in the living room waiting for the time that I could begin cooking. Once I began, I was a madwoman running all over the kitchen (think Meryl Streep in Julie&Julia when she is cooking pasta while Stanley Tucci (Paul) is writing a letter!) I got very lucky though! Everything was done at 6:30pm on the dot right when everyone walked in. Needless to say the cheese appetizer became part of the dessert course! Everyone seemed happy and full at the end of the meal.

"All great change in America begins at the dinner table." ~ Ronald Reagan 

Thursday, June 21, 2012

Tagxedo.com

This website is my new favourite thing. I recently wanted to create a gift for the teacher I worked with this year and thought about making a 'word cloud'. It was kind of frustrating looking through all of the websites that offer the ability to do this. Many were difficult for me to understand or I didn't have whatever they wanted installed. Mike heard my cries of frustration and found me Tagxedo.com.

Tagxedo was so simple, even I could understand it! You get to put in any words you want and it will make it into word cloud art. You then have the option to change the colour, theme, orientation, font, layout, and shape. My favourite part has to be the fact that you can just 'respin' each category until you get to something you like or you can customize each section. For my example below, I typed in words about Rome:


So much fun! I also found out while playing with it today that you can put in the name of a website and it can make one out of it! So naturally, here is one for my blog:


For my coworker, I made a cute whale with words that described all the things she did this year with the kids since her classroom is ocean themed. I printed it out and put it in a shadowbox frame!

So fun and easy! I do have an important tip for adding your words. If you want words to be together, you can not have a space between them. For example, if you want "Trevi Fountain" you need to type in "TreviFountain" Mike and I tried commas, hyphens, and quotes but it only read the words. I also couldn't get it to add numbers to the cloud. Beggars can't be choosers! I'm sure there are other sites that can do this and maybe even better, but Tagxedo was so user friendly, it earned my vote and I have to say, I am having WAY too much fun with it!

"All our words are but crumbs that fall down from the feast of the mind." - Kahlil Gibran

Wednesday, June 20, 2012

Fun Projects!

I can't believe tomorrow is our last day of school! It's so bittersweet - the students and teachers are so ready for summer break but at the same time, I know after a few days of blissful relaxation without having to punch a straw into another Capri Sun, I am going to miss them immensely. It's been such a crazy, wonderful year and definitely my favourite as far as working in a school goes.

Tonight I just wanted to share a few cute fun projects that have been happening!

Cupcake Wrapper Decoration 

Just in case you missed it, I LOVE cupcakes! Which means I have a lot of wrappers. They used to be in a box but they are so cute, I just had to display them. Michael's had this apothecary jar that was just the right size and height to display the wrappers. Now they sit cutely on the counter of my kitchen within arms reach is needed!


Student Bookmark Gift 

I wanted to give the kids something simple and sweet as an end of the year gift. Since I teach reading, I thought bookmarks were a good choice. Anyone can do it and I'm sure many of you have but I took fun coloured papers, printed their names on one side, a Dr. Seuss quote on the other, added a sticker a ribbon for flair, and done! Now all I can do is hope they get used over the summer!


Mother's Day Footprint Art


This was my mom's project but I had to share! I have an incredibly adorable 4 (almost 5!) year old cousin and she stayed with my parents Mother's Day weekend. My mom got canvas at Michael's, found washable paint and glitter, and used my cousin's feet! Princess made 10 of these in all different colours (what a patient girl!) and she and mom added the butterfly bodies. All the women in my family got one. Ours is hanging in our den and I love getting to look at her little feet!


"Children aren't coloring books. You don't get to fill them with your favorite colors." -Khaled Hosseini


Tuesday, June 19, 2012

Wedding Guest Books

One of the things usually kept after a wedding is the guest book. I just love signing them at weddings I go to and knowing that in 40 years, they will still be reading it! There are so many beautiful and unique guest book ideas nowadays and it was really difficult to pick something that fit the feel of our wedding. 

Since pictures are awesome, I wanted to incorporate them somehow. I'd seen photo guest books before but what I decided to do for ours was make a photo book on shutterfly.com but not put any captions like you normally might. The only decision then was what pictures to use. Mike and I have been together for over 8 years. That is a lot of pictures of go through! So instead, I chose the incredible photos my uncle took of us for our engagement session. It was such a nice way to incorporate the photos he took and have an album of them just like we will our wedding photos!


So now we had our traditional guest book with photos but I still wanted something unique, too. I saw a coupon through greenweddingshoes.com (FANTASTIC wedding blog!) for teardropweddings.com for a thumbprint guest book. Even better, they had ones with balloons! Mike and I love the Pixar movie Up! and even walked back down the aisle together as man and wife to the theme 'Married Life' from the opening 10 minutes of the film. Basically, we sent them a picture of us, they made caricatures, sent us proofs, and voila! Adorable, personalized thumbprint guestbook! It is printed on canvas and comes with a smaller paper that explains to guests what to do. I found a Colorbox Ink Pad with rainbow colours that was perfect for making Up 'balloons' and we cut up baby wipes so guests could have clean thumbs. I chose the round ink pad because it was big enough for all thumbs.


All I have to say is J'adore!


It is currently hanging in our living room and our guestbook is on the coffee table. I love having memories of those who celebrate with us!


A memory is what is left when something happens and does not completely unhappen.  ~Edward de Bono

Monday, June 18, 2012

Iced Cappuccino Mix

We are in our last few days of school before summer "vacation!" We only get 4 weeks off for summer this year (though you don't see me complaining the rest of the year when we get 3 weeks off for everything else!) But I don't mind. The sooner we go back to school, the sooner I get to spend most of my day in an air conditioned building!

I wanted to give some treats to people I work with a lot at school plus my parent volunteers and thought that a little caffeine was a good choice. I found a recipe for iced cappuccino mix and decided to put the giant food processor my mother in law gave me for my bridal shower to good use. The nice part was that all the ingredients were fairly cheap and when put together, make a delicious treat! 

I've been having trouble finding mason jars for all the fun ideas I keep seeing on Pinterest but while at Michael's I found these cute little jars in the wedding aisle (usually used for favours) and thought they would hold just enough for a few servings of the mix. I printed a tag, tied it on with a ribbon, and for the final touch I pulled out some old letter stickers and put each persons first initial on the jar. They turned out super cute! 


Iced Cappuccino Mix 

2 cups powdered non-dairy creamer
2 cups instant hot chocolate mix
1.5 cups cup instant coffee granules
1 cup white sugar
1 teaspoon ground cinnamon

Directions: Place in food processor or blender to process to a fine powder.Add 2 heaping teaspoons to cup of hot water for a hot drink, or to cold water or milk and lots of ice for a cold drink. Flavour may vary depending on the type of hot chocolate and instant coffee used. My recipe turned out fine and I didn't have to make any adjustments.  I recommend making a test cup to try and adjusting the flavours if needed before storing. Add more sugar if necessary.

I liked mixing it with a cup of cold milk best. The trouble was that it does not dissolve easily and I considered trying a different recipe but it tasted so good! So I just stuck a straw in and didn't have to sip the undissolved stuff on top. I will definitely be trying this with ice in the Magic Bullet soon!


Cute, easy, personalized, and caffeinated. Just what teachers need to get through the last few days of school!

I believe humans get a lot done, not because we're smart, but because we have thumbs so we can make coffee.  ~Flash Rosenberg

Sunday, June 17, 2012

Eclairs

Happy Father's Day!

 Today is such a special day to celebrate and be thankful for our daddy's and I certainly appreciate mine!

We are having a BBQ at mom and dad's to celebrate and I'm in charge of desserts (of course!) My daddy LOVES eclairs - especially from French's Bakery - so I decided to try my hand at them today. I wasn't quite sure what went into making eclairs. I knew there was dough, filling, and chocolate on top but the process was so different than what I am used to! Let's just say it was a long morning!


I got lucky and only had to buy a few items at the grocery store and loved the recipe I found from allrecipes.com. This is the original recipe but I changed the ingredients below to show what you need for each part of the eclair. The recipe says 9 but I made 11. Mine were probably smaller than the original.

 The dough was easy to make but needs your full attention the whole time! The process is quick and the hardest part for me was stirring in the eggs one at a time. The dough got very difficult to stir and I felt like I needed Mike to come and stir for me! (Yay for lack up upper body strength!) Once done I filled one of my fancy disposable piping bags from Michael's with the dough (Thanks for the tip, Aunt Carmi!) and made each eclair about 5 inches long. They don't rise or expand very much so I could have fit more on a pan than I did but they turned out alright!


When you take the eclairs out of the oven, use a toothpick to poke a hole into each end of the pastry to let steam out so they aren't soggy after they cool!

The filling was very easy to make and tasted delicious! 


My trouble came with the chocolate. After adding the powdered sugar, my frosting looked like 'puppy chow' without the Chex in it. I'm not proud but as my elementary teachers taught me - "It's okay to make mistakes, that's the way we learn!" I tossed it in the trash and tried again. This time I melted the chocolate and butter at an even lower temperature on the stove and found out once I started adding the tablespoons of hot water, it became the beautiful, creamy chocolate I was looking for. 

Eclairs!!

Pastry 

  • 1/2 cup butter
  • 1 cup water
  • 1 cup all-purpose flour
  • 1/4 teaspoon salt
  • 4 eggs
  1. Preheat oven to 450 degrees F (230 degrees C). Grease a cookie sheet.
  2. In a medium saucepan, combine 1/2 cup butter and 1 cup water. Bring to a boil, stirring until butter melts completely. Reduce heat to low, and add flour and salt. Stir vigorously until mixture leaves the sides of the pan and begins to form a stiff ball. Remove from heat. Add eggs, one at a time, beating well to incorporate completely after each addition. With a spoon or a pastry bag fitted with a No. 10, or larger, tip, spoon or pipe dough onto cookie sheet in 1 1/2 x 4 inch strips.
  3. Bake 15 minutes in the preheated oven, then reduce heat to 325 degrees F (165 degrees C) and bake 20 minutes more, until hollow sounding when lightly tapped on the bottom. Cool completely on a wire rack.

Filling
  • 1 (5 ounce) package instant vanilla pudding mix
  • 2 1/2 cups cold milk
  • 1 cup heavy cream
  • 1/4 cup confectioners' sugar
  • 1 teaspoon vanilla extract
For the filling, combine pudding mix and milk in medium bowl according to package directions. In a separate bowl, beat the cream with an electric mixer until soft peaks form. Beat in 1/4 cup confectioners' sugar and 1 teaspoon vanilla. Fold whipped cream into pudding. Cut tops off of cooled pastry shells with a sharp knife. Fill shells with pudding mixture and replace tops.  

Chocolate Frosting
  • 2 (1 ounce) squares semisweet chocolate
  • 2 tablespoons butter
  • 1 cup confectioners' sugar
  • 1 teaspoon vanilla extract
  • 3 tablespoons hot water
For the icing, melt the chocolate and 2 tablespoons butter in a medium saucepan over low heat. Stir in 1 cup confectioners' sugar and 1 teaspoon vanilla. Stir in hot water, one tablespoon at a time, until icing is smooth and has reached desired consistency. Remove from heat, cool slightly, and drizzle over filled eclairs. Refrigerate until serving. 

I know they aren't French's, I know they aren't the most beautiful, but I did it! I made eclairs! Mike and I tested one and he said he liked it as much as he could like an eclair (he doesn't like eclairs) but the real test will be the family tonight - especially the King of Eclairs, Daddy! 

“He has no more backbone than a chocolate eclair” - Theodore Roosevelt


Saturday, June 16, 2012

Wedding Seating Chart

Today I wanted to share how we decided on our seating for the wedding reception. Many tables were easy. Most family, college friends, and coworkers easily fit at their tables making about half of the room set by themselves. The tricky part is those few couples and families that didn't fit with other groups. It isn't fun being a part of the 'extras table' with random people you have nothing in common with so I tried to be as strategic and as nice as I could.

One couple only knew us and we only knew them at their wedding. We sat with a wonderful group when they got married so I tried to return the favour. Then we had to decide who to seat with Husbands dad's family. There were only 4 of them so they definitely needed some other guests at their table. That one was tricky - I hope the family we placed there was okay with it! One couple could have fit in a few places but kept getting moved around due to people changing their RSVP. (Which happened up to 3 days before the wedding!)

I know life happens but when you RSVP to a wedding, try to give a solid answer or let the couple know that there could be a change so they can accommodate you in their plan and numbers.

How exactly did we handle all these changes and tricky seating arrangements? Like this!


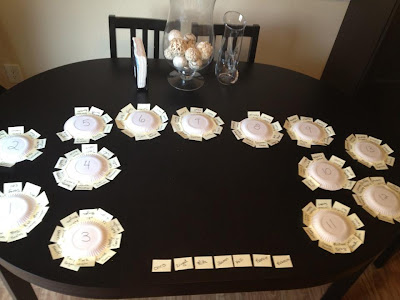
I had mini paper plates left from a craft project I did with my kids last summer and used little post-its. This was an idea I received from another bride-friend of mine a few years ago and am so glad I remembered it! As each RSVP arrived, I wrote each guests name on a post-it, had our table arrangement chart from our site, then my MOH and I got to work! As I said, some tables made themselves but it was so nice to be able to move the post-its around in case of changes.

My venue was incredible and let me have 7-10 seats per table but I know some require the same number for each. This would be especially nice for those that have that restriction. I loved being able to see how the whole room would look, too. I was even able to plan having the younger crowd closest to the DJ and the older crowed (that may have wanted to sit and talk more than dance) further away. 

It's easy to not care about where you seat guests and it's also easy to care too much. I feel like I cared just the right amount and felt that everyone was comfortable at their tables. At least, I haven't heard otherwise!

"Savor all of life's flavours, best enjoyed while still warm. They're the icing on the cupcake." - Barbara Paulding
 

Thursday, June 14, 2012

Wedding Photo Scavenger Hunt and Photo Sharing Cards

Even when you think everything is done, wedding stuff just keeps coming back!

My husband and I recently got married this past March (yay!) and loved how many special touches were added to make our day special. Now that the wedding is over, I have the time to share how those details came to be and how they worked out.

I love children and was actually kind of disappointed when the guest list to our wedding only had 7 "kids" on the guest list. To me, they are the best part of a wedding! I wanted to have something for them to do that was easy to put together, not messy, and appropriate for all ages. Just to give you an idea, our young guests were 16 months, 4, 7, 10, 11, 13, and 14. Goody bags were my first idea and I began gathering items for each young ones interests but that quickly became expensive.

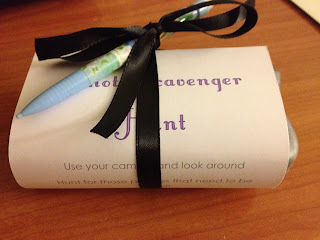
While scouring the internet one night for ideas, I came across photo scavenger hunts. I took some ideas from the ones online I found plus added a few of my own for our specific day. One of my bridesmaids helped with the hunt, too! I used my awesome font Husband showed me how to download, ordered cameras from the Knot during one of their sales, wrapped them up, added a pencil to use to check off the list, and this is what I got:


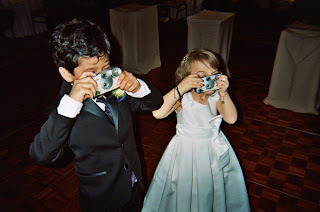
My MOH's sister passed them out (I made a check list for all their names, what table they were at, and if they returned them). The kids loved them! Especially my flower girl and ring bearer. After our honeymoon, Husband and I got them developed and loved seeing our reception through the kids eyes. Sure the photo quality isn't great, but there are some great shots and they were some of the first photos we saw of the wedding. We got the pictures printed at Target, sent the prints to the kids to have and kept the photo disc for ourselves!

Without the cameras, who would have captured shots like these?

 Ring Bearer and Flower Girl!
 People dancing like crazy
 More people dancing like crazy!
 The head table
 A sparkly diamond! 

This is something you could do with all guests, too! You could even make it a 'digital photo scavenger hunt'. Make a card for each table or guest, have them take photos with their own cameras then upload them to a share site. We did a share site for photos but not for a scavenger hunt. Guests received little cards (moo.com!) that had a fun picture of us on the front and information on how to login to a shutterfly.com site to share the photos they took on the day of. I know Facebook is popular with uploading photos but this way, we can order prints if we like! One guest even gave us a gift certificate to the site for us to make a photobook using the pictures provided by our guests! Love it!


The goody bag items did not go to waste! The 16 month old received one because he was a little young for a photo scavenger hunt. His had a toy car, a board book, and some goldfish crackers. I used most of what I bought for the other goody bags on the 3 kids coming to the rehearsal dinner. I wanted them to have something since it's a long evening of visiting and toasts. Theirs included scratch boards, play-doh, mini checkers, magic tricks, and silly bands.

There are always two people in every picture:  the photographer and the viewer.  ~Ansel Adams

Wednesday, June 13, 2012

Peach Cupcakes with Peach Cream Cheese Frosting


 Ooh La La!

These are my current favourite summer cupcake! This was the first recipe I made with my incredible KitchenAid mixer and food processor (Thanks in-laws for the wedding gifts!). I love peaches so this definitely caught my eye. I actually not a fan of frosting. I wipe it off of Sprinkles, cookies, and you can even see me mouthing "No frosting!" to Husband in our wedding video while cutting the cake. Unfortunately, I've discovered that I LOVE homemade frosting - especially this frosting.


Peach Cupcakes with Peach Cream Cheese Frosting
Makes 24 cupcakes

Peach Cake
Ingredients
1 cup (2 sticks) unsalted butter, softened
2 ⅔ cups all-purpose flour
2 ½ teaspoons baking powder
1/2 teaspoon salt
2 cups granulated sugar
3 large eggs
1.75 oz (49 grams) freeze dried peaches, pulverized in a mini food processor
3/4 cup low-fat buttermilk
1/2 cup pureed frozen peaches
1 teaspoon pure vanilla extract

Method
Preheat oven to 350 degrees. Line cupcake tins with liners.

Mix together flour, baking powder, and salt. Set aside. In a large measuring cup or bowl, mix together buttermilk, peach puree and vanilla extract. Set aside until needed.
Using an electric mixer, beat butter and granulated sugar in a mixing bowl until pale, about 2 minutes. Add eggs one at a time, mixing well after each addition. Mix in pulverized peaches.
Mix in flour mixture in three batches, alternating with two batches of buttermilk mixture. Mix until just combined, scraping down bowl as needed. (I like to mix the last bit by hand using a spatula to make sure I get all the stuff at the bottom.) Scoop batter into cupcake tins.
Bake until golden brown and a toothpick inserted into center of cake comes out clean, about 21 to 24 minutes. Allow cupcakes to cool in tins for 10 minutes, and then remove cupcakes and place them on a cooling rack.

Peach Cream Cheese Frosting
Makes enough to frost 24 cupcakes

Ingredients
1 cup of butter, softened
8 oz of cream cheese, softened
1.75 oz (49grams) freeze dried peaches pulverized in a food processor
1 teaspoon vanilla extract
3-5 cups of confectioners sugar

Method
In a large mixing bowl, mix butter until it is softened and uniform. Add cream cheese and beat together until it is uniform. Add vanilla extract and mix. Add pulverized peaches and mix. Add 3 cups of sugar to the mixture and mix. Add more sugar if necessary. Mix again until mixture is creamy and spreadable. Add more sugar if necessary, otherwise prepare to frost cake/cupcakes.

My Notes: As mentioned in the previous post, I used frozen and dried peaches because fresh peaches can mess with the amount of liquid in the fruit. Make sure the frozen peaches have thawed out a bit before you blend them. If you use fresh peaches just adjust flour and powdered sugar to make the batter the right consistency. 

These make a wonderful addition to summer picnics, family BBQ's, or bringing to work to share with your coworkers!


"Why fit in when you were born to stand out?" - Dr. Seuss 

Tuesday, June 12, 2012

White Chocolate Cupcakes with Raspberry Buttercream Frosting

Raspberry season is upon us! Which I why I bought 6 containers of strawberries while at Costco with Husband this weekend. I've already made Julia Child's Raspberry Bavarian Creme but am unsure about how it turned out and want to try again before writing about it. It tasted lovely but the consistency was somewhere between gelatin and custard.

For my second raspberry delectable, I chose to find a recipe using white chocolate. It's a given that I adore cupcakes so my searches drew me there and I found a recipe for wonderful white chocolate cupcakes! There was a recipe for raspberry buttercream frosting on the same page but I wasn't drawn to it. So I searched and found another recipe for frosting and it was perfect! I found these really cute cupcake liners at Michael's and just discovered Big Lot's where I found Ghirardelli white chocolate bars for $1.50 each!


I'm going to post the recipes here but want to include the original sites, too! White Chocolate Cupcakes & Raspberry Buttercream Frosting

White Chocolate Cupcakes
from Baking Bites

1 1/2 cups all purpose flour
1 teaspoon baking powder
1/2 teaspoon salt
1/3 cup butter, softened
3/4 cup sugar
2 large eggs, at room temperature
4 oz white chocolate, chopped
1 teaspoon vanilla extract
1 cup plus 1 tablespoon milk

Preheat oven to 325 F.  Line muffin pans with paper liners.

Whisk the flour, baking powder and salt together in a medium bowl.  Add the white chocolate to a small microwave-safe bowl and heat in 30 second intervals at 50% power, stirring in between each interval, until melted and smooth.

In the bowl of a stand mixer fitted with the paddle attachment, cream the butter and sugar together on medium speed until light, about 3-4 minutes.  Add the eggs, one at a time, beating well after each addition.  Mix in the white chocolate and vanilla extract.  With the mixer on low, alternately add the flour mixture (in 3 additions) and milk (in 2 additions), starting and ending with the flour.  Beat just until incorporated.

Divide the batter evenly among the prepared pans, filling each about 2/3-3/4 full.  Bake for 18-22 minutes, or until a toothpick inserted in the center comes out with just a few moist crumbs.  Transfer the pan to a wire rack and let the cupcakes cool for 5 minutes before removing them from the pan to cool completely.

Makes 15-18 cupcakes

My Notes: Make sure you follow the instructions for melting the chocolate! I've tried to melt chocolate in the microwave before and failed miserably. The technique described here made smooth, beautiful chocolate. I found that the consistency of the cupcake batter was almost like frozen yogurt. I used my medium cookie scoop to fill the liners and each was almost 3/4 full. When the cupcakes came out, the finished product was only about 2/3 of the liner. The cupcake itself was delicious and perfect but I suggest filling the liner just about completely to get a nice, full sized cupcake! 

Raspberry Buttercream Frosting 

1/2 cup butter, softened 
1/2 cup fresh raspberries
1 teaspoon vanilla extract 
1/8 teaspoon salt
1 (16-oz.) package powdered sugar

Beat first 4 ingredients at medium speed with an electric mixer until creamy.
Gradually add powdered sugar, beating at low speed until blended and smooth after each addition.
Note: Be sure to wash and thoroughly dry raspberries before adding to frosting.

 My notes: Yes, dry the raspberries! When adding fresh fruit to a frosting, you need to remember that you may need to add more powdered sugar than usual to account for the extra liquid in the fruit. That is why in my Peach Cupcakes with Peach Frosting (coming soon!) I use dried and frozen peaches to help balance the liquid in the recipe. I haven't practiced much in the art of decorating baked goods but for now I use my fancy ziplock bags and cut the corner to swirl a nice amount of frosting on the cupcake.

 These cupcakes turned out super sweet, rich, and had just the perfect amount of raspberry and white chocolate flavours. Husband, mom, dad, and KM all approved!

"Life's a batch. Eat cupcakes." - Auburn Hutton


Monday, June 11, 2012

Blogs

blogging definition [blawg]
  1. n.
    making an entry into a weblog or blog = online diary. :  When John said he was busy blogging, Sally said he should get a life!   
There is an interesting sample sentence for you! I feel like blogs are a part of having a life now. Being recently married and a Pinterest addict, I have been looking at more blogs that I think I ever have before. They hold some amazing ideas for the home, weddings, recipes, children, teaching, travel... so many of my favourite things! I've been trying many ideas that others have shared recently and, being somewhat creative, have a few of my own. This space doesn't really have a specific purpose. It probably will be used to share anything and everything I think is worth writing about. 

To give you some hints of things I may just find interesting to write about, I am a newlywed, foodie, traveler, teacher, culinary explorer, musician, party planner, reader, champagne lover, a someday mom, pluralist, and a Disney princess. My KitchenAid stand mixer is my new best friend and I live across the street from 53 monkeys, some emus, and an anteater.

Let's see where this goes!

"To lose balance sometimes for love is part of living a balanced life" - Elizabeth Gilbert